Here’s the short version of how to program Chamberlain garage door opener remotes. Find the Learn button on the motor unit, press it once, then hold the button on your remote within 30 seconds. When the lights flash or you hear two clicks, it works. Keypads and cars need a few extra steps, and older openers act a bit different.
Find the Learn Button Before Anything Else
Almost every method here starts with this button.
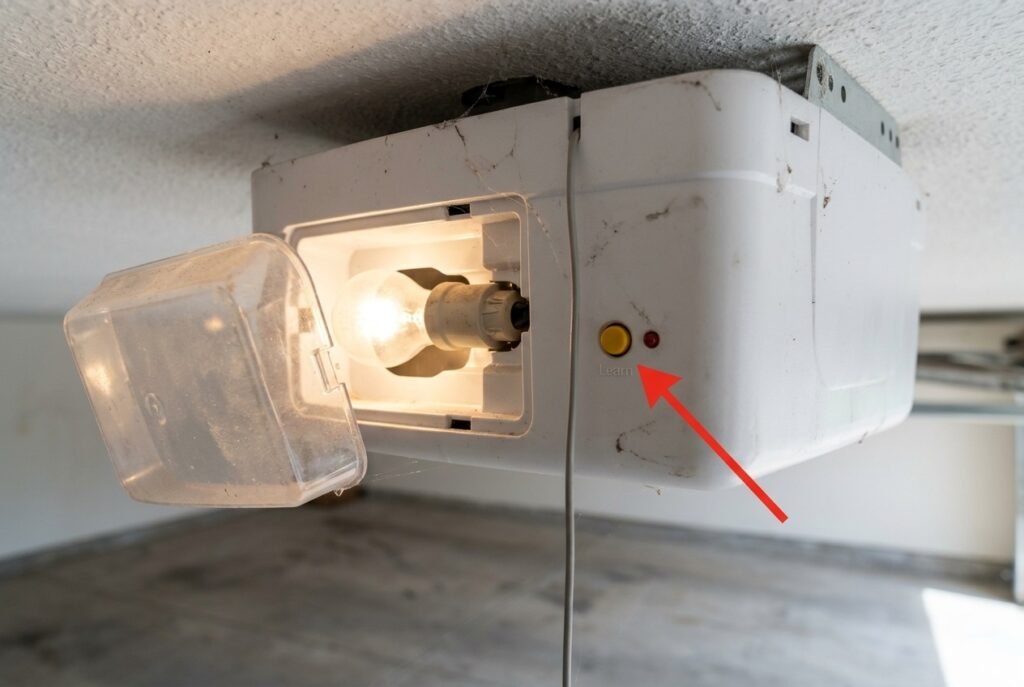
Where the Learn button hides
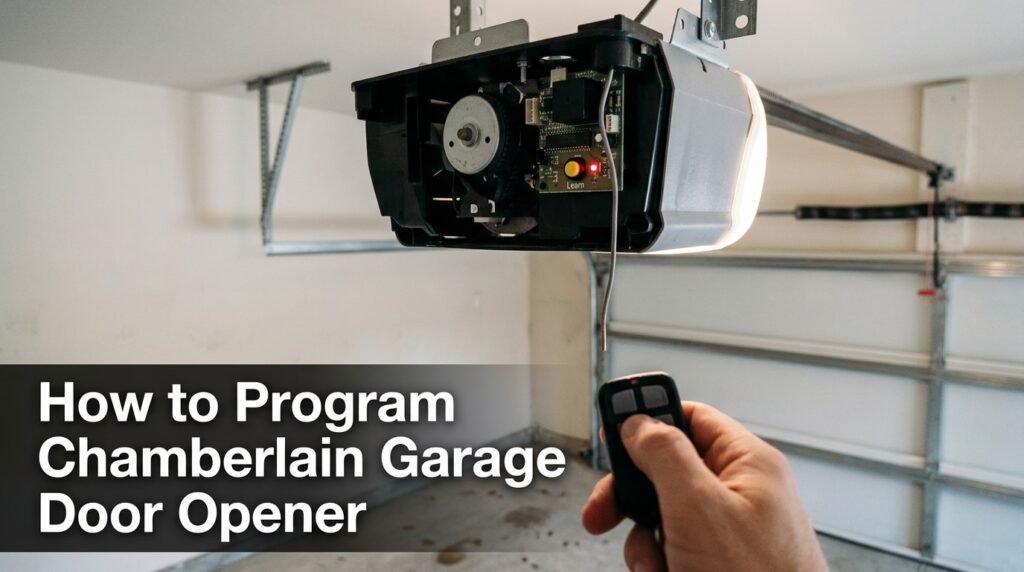
It’s on the motor unit, the big box hanging from your garage ceiling, close to the antenna wire that dangles down. On some models it sits behind the light cover. It’s usually out of reach from the floor, so plan on a ladder.
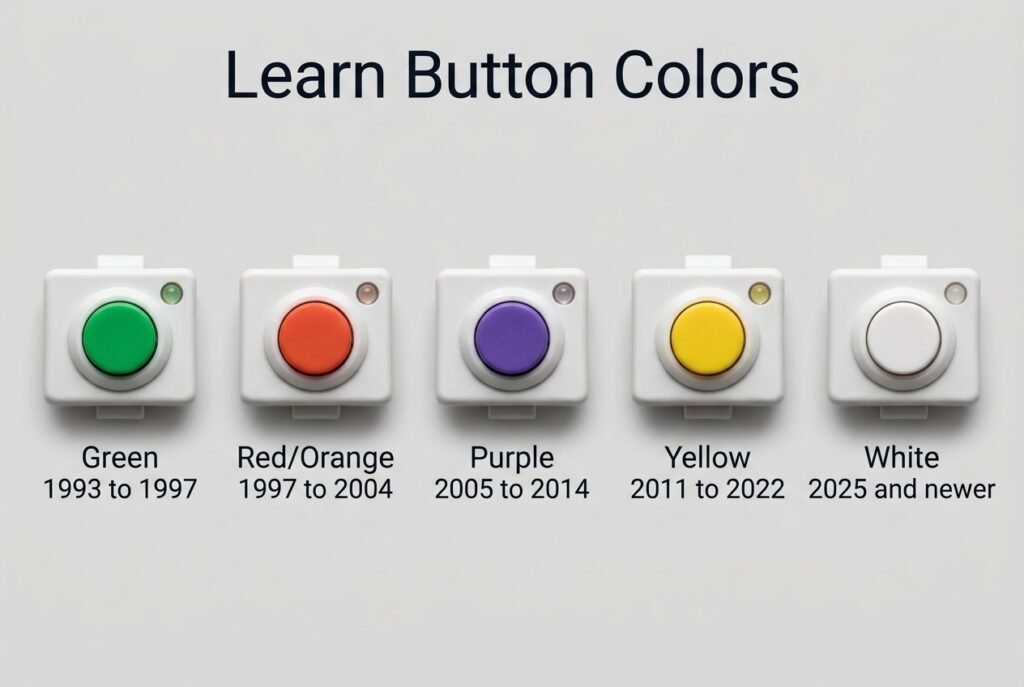
What the Learn button color means
The color shows roughly how old your Chamberlain garage opener is, and that decides which remotes and keypads work with it. Sun fades these buttons, so purple can look brown and red can look orange.
| Color | Rough years | What works with it |
| Green | 1993 to 1997 | Universal remotes and keypads only |
| Red or orange | 1997 to 2004 | Current Chamberlain remotes and keypads |
| Purple | 2005 to 2014 | Current Chamberlain remotes and keypads |
| Yellow | 2011 to 2022 | Current Chamberlain remotes and keypads |
| White | 2025 and newer | All current accessories |
If the color is hard to read, the model number on the motor unit identifies it.
Quick safety stuff
The door can move while you program, so clear the space under it and stay where you can see it. Kids and pets should be out of the garage until you finish.
Program a Chamberlain Remote to Your Opener
There are four ways to program a Chamberlain garage door opener remote, depending on what your opener has.
Method 1: Use the Learn button on the opener
- Press the Learn button once and let go. The LED turns on and stays lit.
- Within 30 seconds, press and hold the button on your remote.
- Let go when the opener lights flash or you hear two clicks.
- Press the remote again to test it.
The 30 seconds start the moment the LED lights, so the remote needs to be in your hand already. If you’d rather watch than read, a short YouTube video of this method is easy to find.
Method 2: Use a wall control with a Learn button
Some wall controls have their own Learn button, which means no ladder.
- Press and release it twice. The LED starts blinking.
- Within 30 seconds, hold your remote button.
- Let go when the lights flash or you hear two clicks.
Models 8500 and RJO20 are different. On those, the wall control’s Learn button is the one you always use.
Method 3: Use an LCD panel
An LCD panel is a wall control with a small screen. Scroll to PROGRAM, pick REMOTE, then hold the remote button until the lights flash or you hear two clicks.
Method 4: Use the myQ app
Wi-Fi openers (yellow or white Learn button, or a “Powered by myQ” label) can add a remote from your phone. Open the app, go to Settings, then Devices, and add an accessory. Choose Garage Door Remote, scan the QR code if your remote has one, and follow the screens. The opener clicks and flashes when it pairs.
Program a Keypad for Your Chamberlain Garage Door Opener
A keypad uses a 4-digit PIN, and the steps depend on the model number printed on its back.
940EV and 877MAX keypads
These have one extra step: you tell the keypad which type of opener it’s talking to.
- Hold * and # until the lights stop blinking.
- Type your 4-digit PIN, then press #.
- Press ENTER the number of times that matches your Learn button:
| Learn button | ENTER presses |
| Yellow | 1 |
| Purple | 2 |
| Red or orange | 3 |
| Green | 4 |
- Press 0.
- Press the Learn button on the opener.
- Within 30 seconds, type your PIN and hold ENTER until the lights flash or you hear two clicks.
- Test it.
The 940EVMC and 877MAXMC work the same way, with the one-press option labeled a little differently.
376LM, 877LM, 940LM and 976LM keypads
From the wall control, tap Learn twice, type your PIN, and press ENTER. From the opener, press Learn once, then within 30 seconds type your PIN and hold ENTER until the opener light blinks.
Changing a PIN or making a temporary one
To change a PIN, type the current one, hold # until the light flashes twice, then type the new PIN and press ENTER. For a guest code, enter a working PIN and hold * until the light flashes three times. Type the temporary PIN, press ENTER, then enter how many hours it should last (up to 255) and press *.
Obvious codes like 1234 are the first thing anyone would try on a keypad outside the house.
Program the Wall Button on a Chamberlain Opener
Most wall buttons never get programmed at all.
Does a wall button need pairing?
Usually not. A standard wall button is wired to the opener with a thin two-wire cable, and it works once it’s connected.
Adding or replacing a wall control
Unplug the opener before touching any wires, and follow the wiring steps in your manual, since the terminals differ by model. Plug the opener back in and press the button. If the door moves, the wall control is working. A wall control with a Learn button or a screen can also add remotes later, using Methods 2 and 3 above.
A wireless wall-mounted keypad is a different device. That’s a keypad, so the keypad steps above apply.
When the wall button stops working
These are worth checking:
- Wires: a loose or damaged wire at either end.
- Lock button: some wall controls have one, and when it’s on, remotes can stop responding, which looks like every remote died at once. How it behaves depends on the model.
- Power: no light on the wall control can mean it isn’t getting power.
No Remote? Here’s What You Can Do
If every remote is gone, how to program chamberlain garage door opener hardware doesn’t really change. You don’t need an old remote to add a new one. You need to reach the Learn button and hold the new remote, and Method 1 covers the rest.
If you’re not sure who else has a remote, erase the memory first (covered in the reset section) and program only the remotes you want.
Program a Chamberlain Garage Door Opener to Your Car
Most newer cars have HomeLink, the built-in garage buttons on the visor or mirror. Steps change a bit between car brands, so this is the general version.
- Park outside the garage, facing the door, and start the car.
- Hold the HomeLink button you want. A slow flash means it’s ready. A fast flash means it’s already used.
- Hold your working Chamberlain remote 1 to 3 inches from that button.
- Hold HomeLink until it flashes slowly. Keep holding it, and also hold the remote’s door button.
- Keep both held until HomeLink flashes fast. This can take up to 20 seconds. Then let go.
- Hold HomeLink for about 2 seconds to test it.
If the door doesn’t move, the opener may use rolling code, a security feature where the code changes every time you press the remote. It needs one more step: press the Learn button on the opener, go back to the car, and press HomeLink two or three times within about 30 seconds. The exact steps depend on the vehicle’s maker and year.
A few cars (some Audi, Porsche and Tesla models) put the sensor in the bumper and guide you on the screen. Some also need a small add-on box called a HomeLink compatibility bridge.
Using a Universal Remote With a Chamberlain Opener
Chamberlain’s universal remote (CHU62) and universal keypad (CHU48) work with every Learn button color above, which matters for green openers, where regular Chamberlain remotes won’t work. To program a universal Chamberlain garage door opener remote, use the same steps as any other remote.
For another brand’s opener, the steps come from that opener’s manual, because Chamberlain doesn’t publish them.
How to Erase Old Remotes From the Opener
Erasing the memory makes sense after buying a used home or losing a remote.
- Make sure no LEDs are lit on the opener.
- Hold the Learn button for 6 seconds.
- Let go when the LED turns off.
This removes every remote and keypad, so you’ll need to program the ones you still want afterward. On yellow-button openers, holding it twice (6 seconds each, within 3 seconds of each other) also clears myQ accessories.
When a Remote Won’t Program
| What’s going on | Likely reason | What to try |
| Learn LED won’t light | Opener is in another mode | Press Learn four times to exit, wait for the LED to go off, start over |
| Nothing happens after Learn | The 30 seconds ran out | Have the remote ready first |
| No flash, no clicks | Remote doesn’t match the opener | Check your Learn button color against the table |
| It worked, then stopped | Weak battery | Swap the battery, reprogram if needed |
| Range is poor | Antenna or interference | Let the antenna hang straight. Some LED bulbs mess with the signal, so try a different bulb |
| Keypad ignores you | Wrong ENTER count | Redo the steps with your color’s number |
| Remote did nothing at all | Wall control Lock may be on | Turn it off and try again |
FAQs
How do I program my Chamberlain garage door opener if the Learn button color is faded?
Look up the Learn button color using the model number on the motor unit. The color decides which method and which remote you need.
Do I need to reprogram after changing the remote battery?
No, the remote remembers. If it stops working after a battery swap, the new battery may not be seated right.
Can one remote control two garage doors?
Yes, if it has more than one button. Each button gets programmed to its own opener.
Conclusion
That’s how to program Chamberlain garage door opener remotes, keypads, wall controls and car buttons. It comes down to the Learn button, its color, and finishing the second step inside 30 seconds. When programming fails, the cause is usually timing, a weak battery, or a remote that doesn’t match the opener.